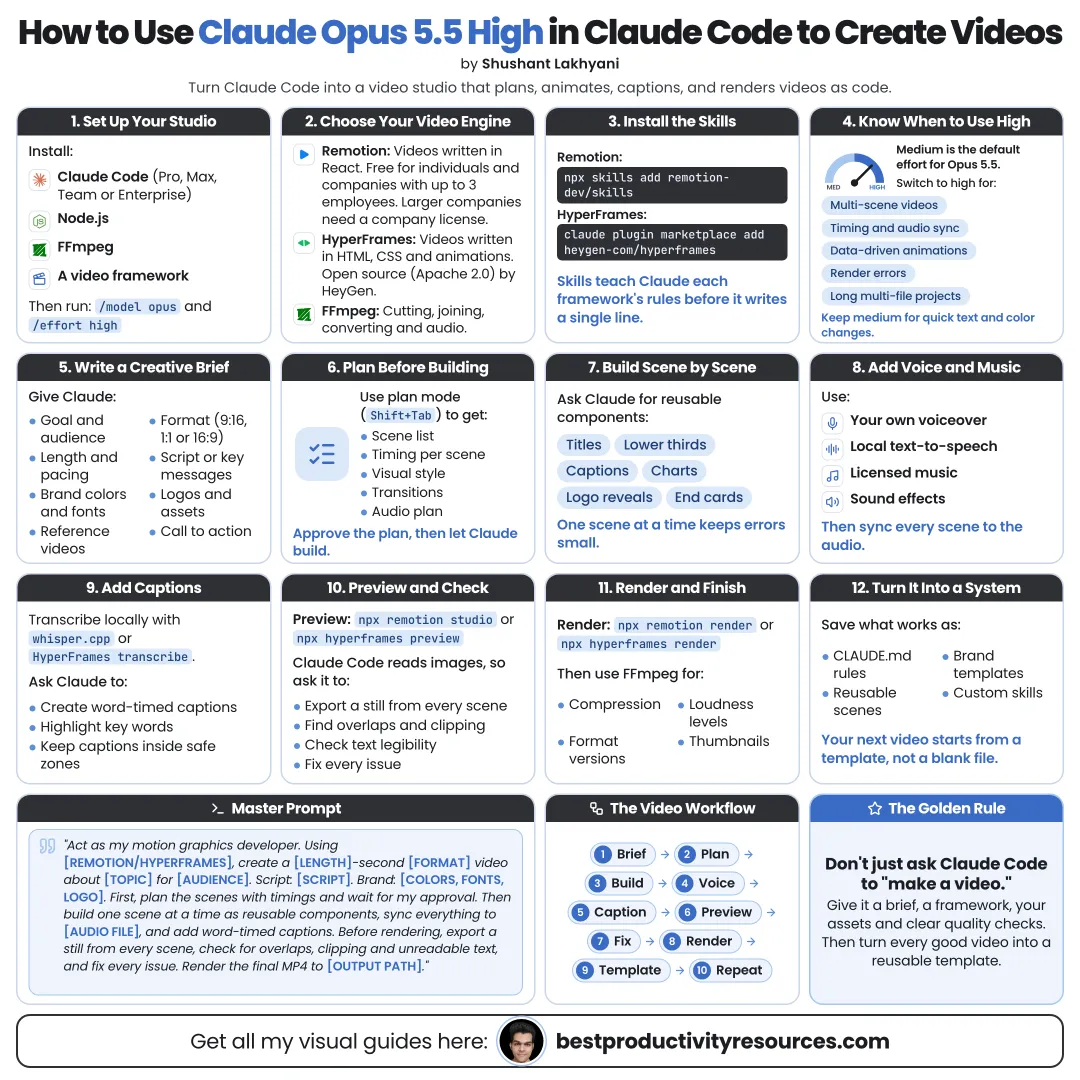
How to Use Claude Opus 5.5 High in Claude Code to Create Videos
Turn a written idea into a rendered video with code, not a timeline
25 bite-sized sections
8 min read
Free, no signup
Short answer
A free, step-by-step guide to creating videos with Claude Opus 5.5 at high effort in Claude Code: setup, Remotion and HyperFrames, briefs, storyboards, brand rules, previews, voiceover, captions, rendering and a master video prompt.
Claude Code is Anthropic’s agentic coding tool. Claude Opus 5.5, released on September 22, 2026, is the newest Opus model from Anthropic.
Claude never draws video pixels itself. It writes the code, assets, and commands that a video framework renders into an MP4. Unlike a regular chat, Claude Code can:
Create and organize your project files
Install the tools each project needs
Write the animation and layout code
Run the preview and render commands
Read error logs and fix the cause
Inspect still frames as image files
Iterate until the render succeeds
Follow the project rules stored in CLAUDE.md
Treat Claude Code as a motion developer that turns your brief into code and then renders it.
02
Check what you need
Claude plan
Pro, Max, Team, Enterprise, or a Console account. Claude Code is not part of the free Claude plan.
Claude Code version
Use v2.1.280 or later to run Opus 5.5.
Node.js
Most code-based video frameworks need it. HyperFrames requires Node.js 22 or later.
FFmpeg
Renders, converts, trims, and inspects your video files.
A video framework
Remotion, HyperFrames, or plain FFmpeg when the edit is simple.
Your assets
Logos, screenshots, footage, fonts, music, and voiceover you have the right to use.
03
Install Claude Code
On macOS, Linux, or WSL, run this:
curl -fsSL https://claude.ai/install.sh | bash
In Windows PowerShell, run this:
irm https://claude.ai/install.ps1 | iex
Open a fresh terminal and run claude --version to confirm the install. Then launch Claude Code from an empty project folder with:
claude
Want a graphical interface instead? The Claude desktop app offers Claude Code in its Code tab.
04
Switch to Opus 5.5 and set high effort
Opus 5.5 offers five effort levels: low, medium, high, xhigh, and max. The default is medium.
Within a session, run:
/model opus
/effort high
Or launch a session with both settings at once:
claude --model opus --effort high
High effort gives Claude more room to plan multi-scene videos, debug failed renders, and check its own output. It also runs slower and draws more from your usage.
Save xhigh and max for unusually hard problems. Drop back to medium for small text or color tweaks.
05
Choose your video framework
Remotion
Builds videos as React components. Pick it if you already know React or need data-driven video at scale. Free for individuals and for organizations of up to three people; larger companies need a company license.
HyperFrames
An open-source framework from HeyGen that renders HTML, CSS, and JavaScript into video. It supports GSAP, CSS animations, Lottie, and Three.js. It is Apache 2.0 licensed, and rendering locally does not spend HeyGen credits.
FFmpeg only
Fits slideshows, simple title cards, trims, composites, captions, and format conversions.
Use one framework per project. Every extra framework multiplies the setup problems.
06
Add the official agent skills
Skills teach Claude each framework’s conventions, so its code matches what the framework expects.
For Remotion, run:
npx skills add remotion-dev/skills
For HyperFrames, add the Claude Code plugin:
claude plugin marketplace add heygen-com/hyperframes
claude plugin install hyperframes@hyperframes
Then open a new Claude Code session so the skills can load.
07
Write a creative brief
Answer the questions a video editor would ask. Include:
Goal of the video
Target audience
Platform plus aspect ratio (16:9, 9:16, or 1:1)
Duration
Frame rate
Key message
Tone and pace
Brand colors and fonts
Assets to use
Voiceover or on-screen text alone
Music style
Call to action
A vague brief gets you a generic video. A specific brief gets you your video.
08
Plan before building
Have Claude propose a plan first, so you can fix the direction before any code exists.
Prompt:
Read this brief. Before you write any code, propose the scene list, timing, visual style, transitions, and file structure. List every asset or decision you still need from me.
Approve or edit the plan, then let Claude start building.
09
Build a storyboard
Ask Claude to turn the plan into a scene-by-scene storyboard that lists:
Scene number
Start and end time
On-screen text
Visual elements
Motion and transitions
Voiceover line
Sound effect or music changes
Read the storyboard aloud against a timer. If a line does not fit comfortably in its slot, lengthen the scene.
10
Store your brand rules in CLAUDE.md
Claude Code loads CLAUDE.md at the start of each session. Record the rules every video must follow:
Brand colors as precise hex values
Font families and weights
Logo file paths and their minimum sizes
Caption and button safe zones
Caption style
Preferred transitions
Elements to avoid entirely
Default resolution and default frame rate
Every future video then stays on brand without you repeating yourself.
11
Gather assets you hold the rights to
Place every asset in one assets folder and tell Claude what each file contains.
Logos and icons
Product screenshots or screen captures
Photos and footage
Fonts with the correct license
Music licensed for your platform
Voiceover recordings
Never use copyrighted music, footage, or fonts unless your license covers how you will publish.
12
Generate the first draft
Prompt:
Build the video from the approved storyboard and follow our brand rules in CLAUDE.md. Use files from the assets folder only. Put each scene in its own component or file. When the code is ready, start the preview and tell me how to open it.
Treat the first draft as a starting point, not a finished video.
13
Preview before you render
Previews run faster than full renders, which keeps small fixes cheap.
Remotion
npx remotion studio
HyperFrames
npx hyperframes preview
Claude cannot watch a video file. Have it pull still frames at key moments with FFmpeg, then check those images for overlapping text, clipped elements, and weak contrast.
14
Give precise feedback
Swap “make it better” for feedback Claude can act on:
“Scene 3: the headline comes in too fast. Make it 0.6 seconds.”
“At 0:12, the logo covers the caption.”
“Use the brand blue for all highlights.”
“Hold the closing call to action two seconds longer.”
“The transitions feel busy. Switch to simple fades.”
Timestamps, scene numbers, and exact values take out the guesswork.
15
Add voiceover and captions
Record your own voice or use a text-to-speech service your license covers.
Then ask Claude to:
Transcribe the voiceover and add timestamps
Time the on-screen text to the narration
Build captions from the transcript
Keep captions within platform safe zones
Check the spelling of names and numbers
Captions make videos accessible and easy to follow on mute.
16
Add music and sound
Use only licensed music
Duck the music under the voiceover
Add subtle sound effects at key moments
Normalize loudness so the mix is neither too quiet nor too loud
Fade the music in and out cleanly
Have Claude measure the final audio levels with FFmpeg before you export.
17
Render the final video
Remotion
npx remotion render
HyperFrames
npx hyperframes render --output video.mp4
Request an H.264 MP4 for the broadest compatibility, then have Claude confirm the duration, resolution, frame rate, and audio track with ffprobe.
18
Spin variations out of one project
When one version works, reuse it to make:
Vertical, square, and widescreen cuts
Alternative hooks for testing
Shorter cut-downs
Translated versions
Personalized versions built from a data file
Seasonal or campaign variants
Code-based video keeps variations cheap, because only the inputs change.
19
Turn your strongest video into a template
Have Claude convert a finished project into a reusable template or skill with:
Editable variables for text and color
Scene components you can reorder freely
Documented asset slots
A render and review checklist
Your second video should take a fraction of the time your first one did.
20
Check before you publish
Review these yourself:
Facts, numbers, and claims
Spelling in on-screen text and captions
Brand accuracy
Licenses for music, fonts, and footage
Text legibility on a phone screen
Audio levels
The first three seconds
Claude can check frames and files. You remain responsible for what you publish.
21
Follow the simple video stack
Brief
Set the goal, audience, format, and message.
Plan
Approve the scenes and structure before any code.
Storyboard
Time each scene and each line.
Build
Let Claude write all the video code.
Preview
Check frames before you render.
Refine
Give precise feedback with timestamps.
Render
Export the file and verify it.
Reuse
Turn the finished project into a template.
22
Use the master video prompt
Copy and paste it, then fill in the brackets:
Act as my motion designer and video developer for this project.
Create a [duration] [aspect ratio] video for [platform] about [topic] for [audience].
The goal is [goal]. The call to action is [call to action].
Use [Remotion / HyperFrames] and follow the brand rules in CLAUDE.md.
Use assets from the assets folder only. Ask me before you use anything else.
First, propose a scene-by-scene storyboard with timings and wait for my approval.
Then build each scene as its own file, start the preview, and extract still frames at key moments so you can check text, spacing, and contrast.
Fix every problem you find, render an H.264 MP4, and confirm its duration, resolution, frame rate, and audio with ffprobe.
List anything you were unsure about.
23
Hand these jobs to Claude
Project setup
Animation and layout code
Scene timing
Caption files
Render commands
Frame checks
Error fixes
Variations and templates
24
Keep these jobs yourself
The idea and message
Creative direction
Asset and music licensing
Factual accuracy
Brand approval
Final review
Publishing decisions
25
Avoid these mistakes
Do not begin without a brief
Do not skip the storyboard step
Do not run a full render for every small change
Do not use assets you lack the rights to
Do not publish before you watch the final file yourself
Do not use xhigh or max effort on simple edits
The real opportunity
Do not ask Claude to “make a cool video.” Hand it a brief, a storyboard, brand rules, and a way to check its own frames.
Brief
Plan
Storyboard
Build
Preview
Refine
Render
Reuse
The goal is not one lucky video. It is a repeatable video system you can rerun tomorrow.
What does “How to Use Claude Opus 5.5 High in Claude Code to Create Videos” cover?
It has 25 sections, starting with “Learn how Claude Code makes videos”, “Check what you need”, “Install Claude Code” and “Switch to Opus 5.5 and set high effort”, plus 21 more sections.
How long does it take to read?
About 8 minutes. Every section is a short, self-contained card, so you can jump straight to the part you need.
Is this guide free?
Yes. The full guide is free to read on this page, with no sign-up.
For research and ideas only. Results vary and nothing here is a promise of income. See our Disclaimer.
See you Monday!
Weekly newsletter
Everything new, every Monday.
One short email every Monday with everything shipped that week: new free tools and websites, new guides, new free browser tools and what's new in my free Gumroad libraries, plus how the site is growing. Free, and you can unsubscribe anytime.
You sign up on Gumroad, which stores your email to send the newsletter. See our Privacy Policy.
Cookies and your choices
Visits are counted by Cloudflare Web Analytics, which sets no cookies and stores nothing on your device. An affiliate tracking script from Impact.com also loads on our pages and can set its own cookies so partner companies can credit us for sign-ups. Essential storage is always on so pages load and work correctly. You decide whether your browsing preferences are saved on your device. Read the Privacy Policy.