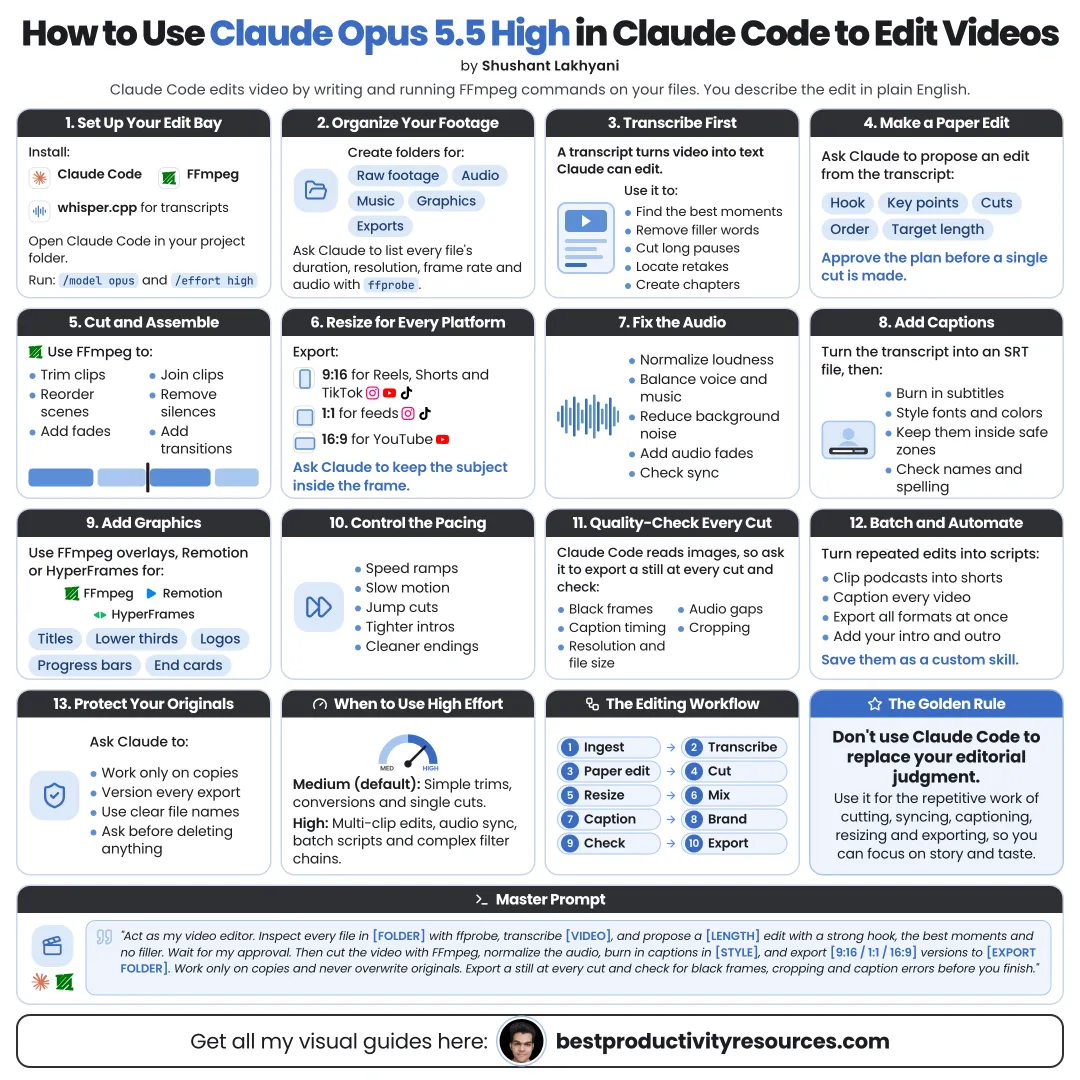
How to Use Claude Opus 5.5 High in Claude Code to Edit Videos
Turn raw footage into a clean, captioned edit with transcripts, FFmpeg, and code
27 bite-sized sections
8 min read
Free, no signup
Short answer
A free, practical guide to editing videos with Claude Opus 5.5 at high effort in Claude Code: protect originals, transcribe, cut from the transcript, remove silences, check frames, add captions, fix audio, reframe for vertical, and export.
Claude Code edits video by running command-line tools, mainly FFmpeg, on your files. It never works inside a visual timeline.
Claude cannot watch video files directly. It works from data about the video:
Timestamped transcripts
Still frames saved as images
Silence and loudness readings
File details from ffprobe
Your own notes and timecodes
From that data it can plan cuts, write the commands, run them, and check the output.
Treat Claude Code as an assistant editor that reads the transcript and never tires of repetitive cuts.
02
Gather what you need
Claude plan
Pro, Max, Team, Enterprise, or a Console account. Claude Code is not on the free plan.
Claude Code
Version v2.1.280 or later to run Opus 5.5.
FFmpeg
The engine that cuts, joins, encodes, captions, and processes audio.
A transcription tool
For example OpenAI’s open-source Whisper or whisper.cpp, both of which run locally.
Your footage
Along with a separate backup of every original file.
03
Run Opus 5.5 at high effort
Launch Claude Code in your project folder with:
claude --model opus --effort high
Or switch mid-session with /model opus and /effort high.
High effort pays off on multi-step edits like transcript-based cutting, where Claude must reason across timestamps, files, and commands. Drop to medium for simple conversions.
04
Protect your originals
Before you edit anything:
Back up every original outside Claude’s working folder
Store originals in a raw folder
Tell Claude never to change or delete that folder
Save every output as a new file
Label versions clearly, such as edit_v1, edit_v2
Put the rule “Never modify, move, or delete anything in raw/” in CLAUDE.md.
05
Organize the project
Ask Claude to set up a simple folder structure:
raw/
Original footage, never touched
proxies/
Lightweight copies for fast work
transcripts/
Text and timestamp files
frames/
Stills for visual checks
cuts/
Cut lists and edit notes
exports/
Finished videos
A clean structure makes every later step easier to automate.
06
Inspect your footage
Prompt:
Run ffprobe on every file in raw/. Report duration, resolution, frame rate, codec, audio channels, and anything likely to break joins, such as mixed frame rates or variable frame rate.
Mismatched clips often cause broken joins and audio drift. Catch them first.
07
Create proxies for speed
For long or high-resolution footage, have Claude make lower-resolution proxy copies.
Run transcription, frame checks, and test cuts on the proxies. Apply the final cut list to the originals at export.
You experiment quickly and still export at full quality.
08
Transcribe everything
Have Claude transcribe each clip with word-level or segment-level timestamps.
A good transcript helps you:
Edit by reading, not scrubbing
Spot filler words and false starts
Catch repeated takes
Generate captions
Pull strong quotes for short clips
Fix names, brands, and technical terms in the transcript before it feeds your captions.
09
Edit from the transcript
Prompt:
Read the transcript. Mark what to remove: filler words, false starts, repeated takes (keep the best or last complete take), and long pauses. Remove nothing that changes the meaning. Present the cuts as a table with start time, end time, transcript text, and reason.
Review the cut table before anything renders. Your editorial judgment matters most here.
10
Remove silences carefully
Have Claude find silences with FFmpeg’s silencedetect filter and suggest cuts.
Set a silence threshold that suits your recording
Leave a little padding so no words get clipped
Keep pauses that land a point
Test on a short section before the full file
Tight cuts feel energetic. Cuts with no room to breathe feel robotic.
11
Assemble the edit
Have Claude build the edit from the approved cut list.
Note: stream copy is fast but only cuts cleanly on keyframes, so cuts can land a few frames off. Re-encoding gives frame-accurate cuts.
Prompt:
Apply the approved cut list to the original files using frame-accurate cuts. Keep the audio in sync. Export edit_v1.mp4 to exports/ and overwrite nothing.
12
Check every cut visually
Have Claude grab a frame just before and just after each cut, then review those images for:
Jarring jump cuts
Black or frozen frames
Mid-blink or awkward expressions
Visual mismatches between takes
Clipped text or graphics
Then watch the full edit yourself at normal speed.
13
Add captions
Have Claude build an SRT caption file from the corrected transcript, timed to the final edit.
Sidecar captions
Upload the SRT file on its own. Viewers can switch captions on or off.
Burned-in captions
Render captions into the picture. Best for social feeds that autoplay on mute.
Keep lines short, readable on a phone, and clear of platform buttons.
14
Clean up the audio
With FFmpeg, Claude can help you:
Even out loudness with the loudnorm filter
Reduce steady background noise
Cut low rumble with a high-pass filter
Duck music under speech
Match levels across clips
Fade audio in and out
Around −14 LUFS is a common loudness target for online video. Confirm your platform’s guidance.
Bad audio drives viewers away faster than imperfect visuals.
15
Adjust the look
For basic fixes, FFmpeg can apply:
Brightness and contrast tweaks
Saturation tweaks
A color lookup table (LUT)
Cropping and scaling
Sharpening
For serious color grading, switch to a dedicated editor such as DaVinci Resolve or Premiere Pro.
16
Reframe for vertical video
Have Claude crop a 16:9 edit to 9:16 for Shorts, Reels, or TikTok.
Keep the speaker’s face in frame
Move captions into a safe area
Check frames at the start, middle, and end
Shift the crop wherever the subject moves
Automatic center crops often cut people off. Check frames every time.
17
Add titles and graphics
Choose an approach:
Simple text
Use FFmpeg’s drawtext filter for titles and lower thirds.
Animated graphics
Build overlays in Remotion or HyperFrames, then composite them onto the edit.
Save your brand colors and fonts as rules in CLAUDE.md so every graphic matches.
18
Pull short clips from the edit
Prompt:
Using the transcript, find the five strongest standalone moments between 20 and 60 seconds long. Each must make sense without context and open with a strong first line. List the start and end times, the opening line, and why each one works.
Approve the list, then have Claude cut, reframe, and caption each clip.
19
Hand finishing to a timeline editor
Some edits need hands-on finishing. Have Claude export your cut list as an EDL, which DaVinci Resolve and Premiere Pro can both import.
Let Claude handle the repetitive cutting. Do the final creative polish yourself in your editor.
20
Work in Adobe? Use the connector
In the Claude apps, the Adobe for Creativity connector links Claude to Creative Cloud apps, including Photoshop and Premiere.
Reach for Claude Code to automate file-based work, and the connector when your project lives inside Adobe apps.
21
Automate repeat edits
If you cut the same kind of video every week, have Claude turn the workflow into a script or a Claude Code skill that:
Transcribes new footage
Proposes cuts for you to approve
Applies your audio settings
Adds branded captions
Exports every format you need
Keep the approval step. Automation prepares edits. It does not publish them.
22
Run one final quality check
Before you publish, confirm that:
Audio stays in sync to the last frame
No words get clipped at cuts
Captions match the spoken words
Names and numbers are accurate
Loudness stays consistent
Resolution and frame rate are right
The file plays on a phone
23
Follow the editing loop
Protect
Back up originals and edit only copies.
Inspect
Check each file’s format first.
Transcribe
Turn speech into text you can edit.
Decide
Sign off on a written cut list.
Cut
Apply frame-accurate edits.
Check
Review frames, then watch the edit.
Finish
Add captions, audio fixes, and graphics.
Export
Render every format you need.
24
Use the master editing prompt
Copy and paste it, then fill in the brackets:
Act as my assistant video editor for this project.
Never modify, move, or delete files in raw/. Write every output to a new file.
1. Inspect each clip with ffprobe and flag any format problems.
2. Transcribe each clip with timestamps.
3. Propose a cut list as a table that removes filler words, false starts, repeated takes, and long pauses without changing the meaning. Wait for my approval.
4. Apply the approved cuts with frame-accurate edits and keep the audio in sync.
5. Extract frames around each cut and check for jump cuts, black frames, and awkward moments.
6. Normalize loudness, add [burned-in / sidecar] captions in our brand style, and export a [aspect ratio] H.264 MP4 to exports/.
Report every change you made and anything you were unsure about.
25
Let Claude handle the routine work
File inspection
Transcription
Proposed cut lists
Repetitive cutting
Frame checks
Caption files
Audio normalization
Format exports
26
Keep the judgment calls yourself
Story and pacing
Cut approvals
Creative polish
Caption accuracy
Rights to footage and music
Final viewing
Publishing
27
Avoid these mistakes
Do not let Claude touch your only copy of the footage
Do not render before you review the cut list
Do not trust automatic crops until you check frames
Do not publish captions you have not proofread
Do not use stream copy when cuts must be frame-accurate
Do not skip watching the final file
The golden rule
Do not ask Claude to “edit my video.” Hand it transcripts, rules, a cut list to propose, and frames to check.
Protect
Inspect
Transcribe
Decide
Cut
Check
Finish
Export
The goal is not to replace the editor. It is to strip out the repetitive work so the editor can focus on the story.
What does “How to Use Claude Opus 5.5 High in Claude Code to Edit Videos” cover?
It has 27 sections, starting with “Understand how Claude Code edits video”, “Gather what you need”, “Run Opus 5.5 at high effort” and “Protect your originals”, plus 23 more sections.
How long does it take to read?
About 8 minutes. Every section is a short, self-contained card, so you can jump straight to the part you need.
Is this guide free?
Yes. The full guide is free to read on this page, with no sign-up.
For research and ideas only. Results vary and nothing here is a promise of income. See our Disclaimer.
See you Monday!
Weekly newsletter
Everything new, every Monday.
One short email every Monday with everything shipped that week: new free tools and websites, new guides, new free browser tools and what's new in my free Gumroad libraries, plus how the site is growing. Free, and you can unsubscribe anytime.
You sign up on Gumroad, which stores your email to send the newsletter. See our Privacy Policy.
Cookies and your choices
Visits are counted by Cloudflare Web Analytics, which sets no cookies and stores nothing on your device. An affiliate tracking script from Impact.com also loads on our pages and can set its own cookies so partner companies can credit us for sign-ups. Essential storage is always on so pages load and work correctly. You decide whether your browsing preferences are saved on your device. Read the Privacy Policy.